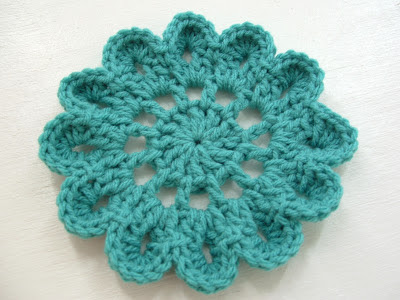
Check out this awesome tutorial for circle center granny squares. I absolutely love the colors! Almost has a vintage vibe going on :) Love! Look over here for the tutorial...

Showing posts with label yarn. Show all posts
Showing posts with label yarn. Show all posts
29.6.12
Candied Rainbow Yarn
Check out what I did yesterday!


I've been experimenting with some new dying methods lately. I've been using Kool-Aid and the microwave to make my creations! I've also been spot-dying. Which is basically hand painting sections of dry/damp yarn, rather than pouring the dye over yarn in a bowl of water.

I noticed that, using this method, I get more vibrant colors, and the colors also go where I want them to. Totally takes the guesswork out of this activity. And I truly love the result!

I used one packet each of Strawberry, Pink Lemonade, Mixed Berry (which is actually the blue), Lemon-Lime, Orange, and Peach Mango.

The only problem with dying yarn, is that I never know what to do with the yarn afterwards! It's just too pretty to use! Any thoughts?

I've been using Fisherman's Wool by Lion brand. After all the lanolin oil is rinsed out, this yarn dyes beautifully! And it's impressively soft.

I love dying yarn. It's just too much fun to make my own colorways, the way I want them, and then see how they turn out.
To borrow the old cliche, "I never met a yarn I didn't like". Or something like that...
♥Grace Ann♥
27.6.12
Crochet Owl Family

Cute! I love owls! Check out the free pattern at Repeat Crafter Me. Which, by the way, is the most creative blog name ever! :)
8.5.12
my W.I.P.s
Hey everyone! I wanted to take some time to snap some pics of my current works in progress. I must say that I am enjoying them to the fullest... switching back and forth between rounds and motifs--in the most gorgeous colors. Who says acrylic can't be pretty?
My first project is a japanese flower *something*. I honestly have no idea whether this is going to become something huge, or stay as a shawl/wrap as Lucy of Attic24 created. But I am so enjoying these flowers! They are so quick and so easy that it's rather silly.


I found these colors of Red Heart Super Saver when I was in Walmart last and they screamed my name. Surprisingly, they are very soft. But I find that with Red Heart sometimes--some colors are more rough than sandpaper, and others feel like they shouldn't be labeled acrylic. All four of these colors are wonderfully soft and squishy.


WIP #2

Pretty..... yes--my next WIP is the Wool-Eater blanket. Not sure I'm adoring these colors though. It kind of started as a test swatch but then just grew. I think with a few more round I may like this one better. What do you think?

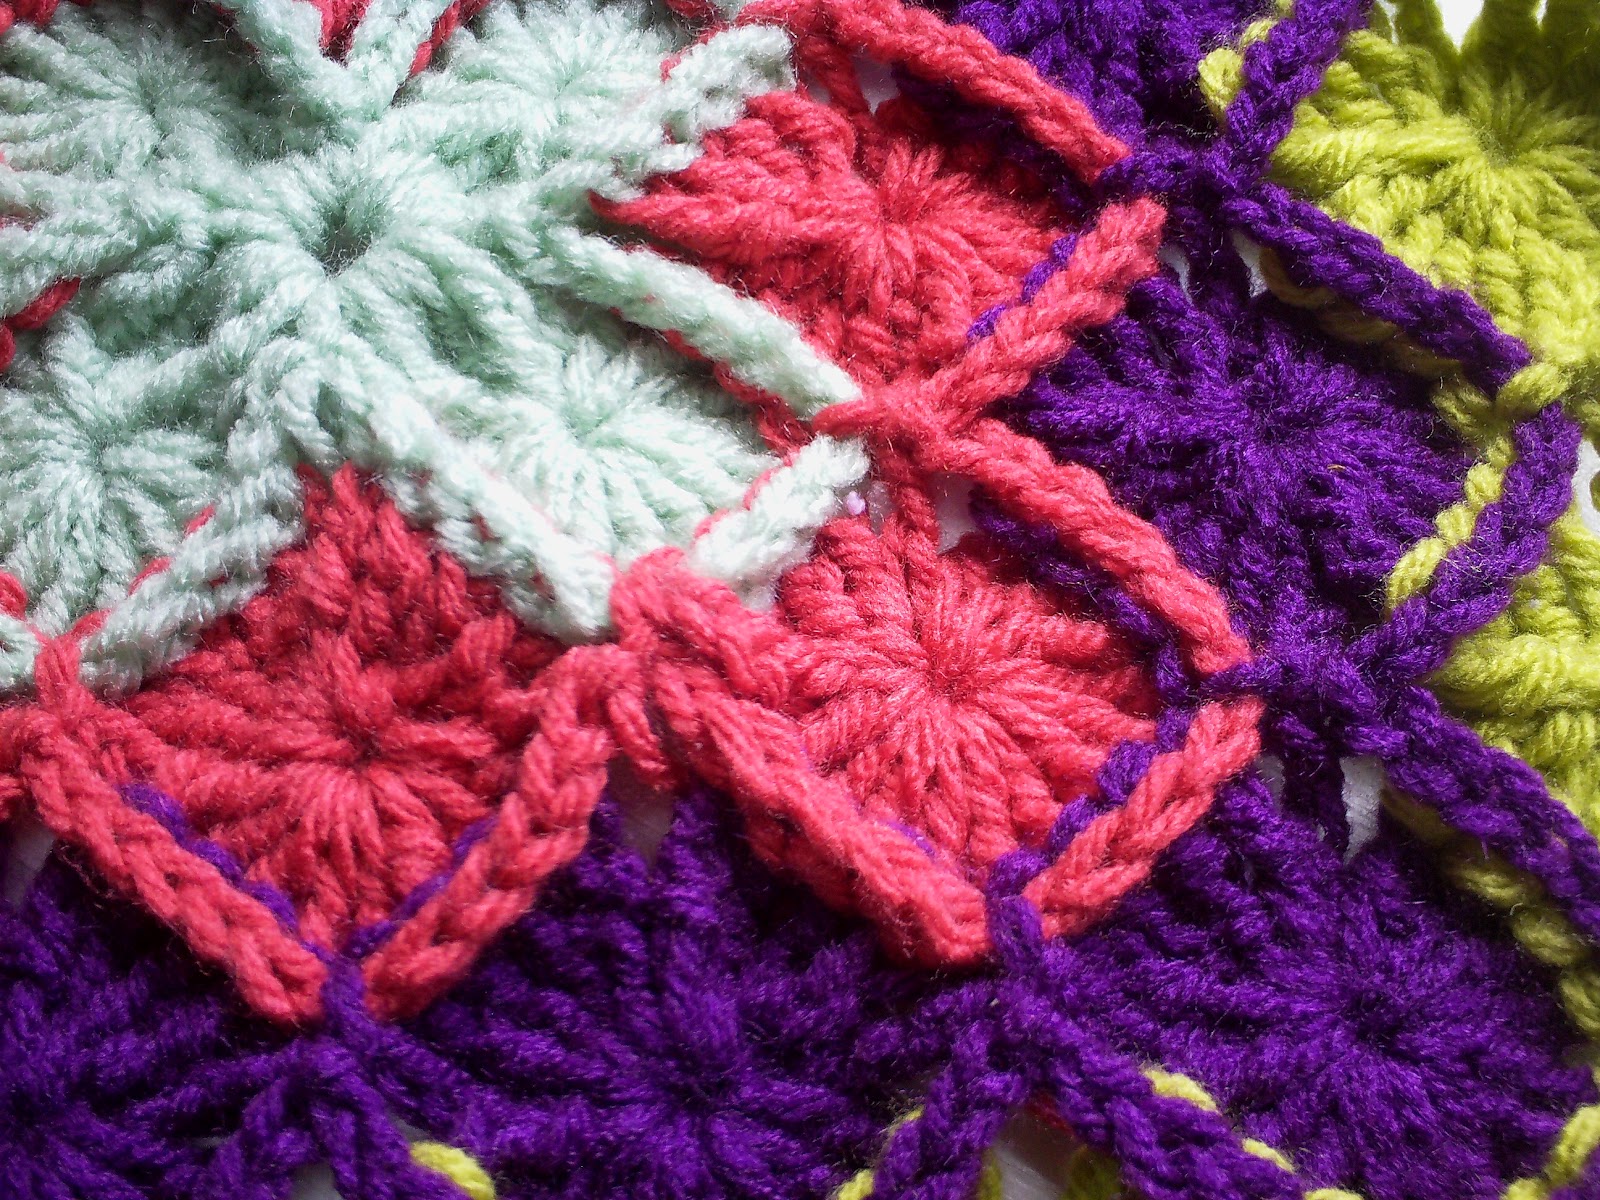
I must admit I never like the Triple Crochet stitch. It just 'took too long' and 'was too boring'. But that doesn't even apply with this pattern. It seems to be very quick and simple and grows very quickly. Has great texture and weight and it's pretty mindless once you get the hang of it...


Okay, so that's all I have for now! I hope you have a wonderful rest of the week!
♥Grace Ann♥
2.5.12
Japanese Flower Motif--FREE pattern!!
Hey everyone!
Enjoy my lovelies!
♥Grace Ann♥
I've been loving the Japanese flowers I've seen lately, but I just couldn't find a pattern. I'd find one, click on it, and the page had 'expired' or 'been taken offline' or been written in 'French'. Weird, right?
Anywho, there were enough pictures on Ravelry for me to at least sort of figure out my own version. I think I may just be pretty close!
Please note: I have no idea if this pattern is copyright to someone or not. I've seen it in quite a few places, so I don't think it's wrong of me to make my own version. I did NOT copy this pattern from somewhere, I just used various pics to formulate my own plan.
Okay, here ya go!!

Any yarn, with any hook can be used here :)
PATTERN:
Make a magic ring
Round 1: Ch4, dc in ring, ch1, *dc in ring, ch 1* 10 times. Join into first ch4 space. (12 ch1 spaces)
Round 2: Ch 4, dc in next ch1 space, ch 1, *Dc in next chain 1 space, ch 1* Around, join in initial ch4 space.
Round 2: Ch 4, dc in next ch1 space, ch 1, *Dc in next chain 1 space, ch 1* Around, join in initial ch4 space.
Round 3: Ch3, dc in first ch1 space (which is part of your ch4 from rnd 2), ch4, 2dc in same space. *2dc in next ch1 space, ch4, 2dc in same space* around. Join to top of ch3.
Round 4: Ch1, sc in same st. 8dc in ch4 space. *Sc in between 2nd and 3rd dc (from round 3) away from hook, 8dc in ch4 space* around join with top of sc.
Find the video tutorial (by the lovely StitchinStacy) right here! She does an excellent job of explaining the pattern, so if you need some extra help, be sure to watch the video!
Crochet Japanese Flower Video Tutorial
Find the video tutorial (by the lovely StitchinStacy) right here! She does an excellent job of explaining the pattern, so if you need some extra help, be sure to watch the video!
Crochet Japanese Flower Video Tutorial
So go make a ton of 'em! Super quick, super easy, and super cute!
♥Grace Ann♥
2.4.12
Ruffle Rosie Brooch--FREE pattern!
Hey bloggies!
I am really into ruffles lately... something about their fluffy, fun nature makes me want to put them on everything! With Easter approaching, wouldn't it be great to make a Ruffly flower corsage for that special lady in your life? or even yourself? Pick your favorite color of yarn, and a little bit of green for the leaves, and you're on your way! Doesn't take long :)


Materials:
Some yarn in the color of your choice
Some green yarn for the leaves (Optional)
A pinback
Some felt
Hot glue or needle/thread
Special Stitches:
Picot: Chain 3, sl st in the first of the three chains.
Pattern (Rose):
Make magic ring
Rnd 1: Ch2, 10 hdc in ring. Sl st in first hdc. (10 HDC)
Rnd 2: Ch2, 2 hdc in same st as join. *3 hdc in next stitch* repeat from *to* in each hdc around. (30 HDC)
Rnd 3: Ch2, 2 hdc in same st as join. *3 hdc in next stitch* repeat from *to* in each hdc around. (90 HDC)
Rnd 4: Ch2, 2 hdc in same st as join. *3 hdc in next stitch* repeat from *to* in each hdc around. (270 HDC)
And that's it! Fasten off and admire!
Pattern (Leaf):
Make 2
Ch10, sc in 2nd ch from hook, hdc in next 2 sts, dc in next st, 2dc in next st, dc in next st, hdc in next 2 sts, sc in last st, Picot, (working in other side of chain) sc in next, hdc in next 2 sts, dc in next, 2 dc in next st, dc in next, hdc in next 2 sts, sc in last st. Sl st to first sc. Fasten off.
Now hot glue (or sew) your leaves to the back of your rose. Then, cut a circle of felt the size of the back of your rose, hot glue it to the back. Now sew a pinback in the center of your felt circle, and you're done!!
Isn't it pretty!? Such a great TV watching project! :)
Have fun!
♥Grace Ann♥
20.2.12
Yarn, Yarn, and more Yarn!!
Hey bloggers!
This past weekend was spent dying yarn! How fun! And with beautiful results!!
Check this out:


 Love. it. I mean seriously, how could you not want to dive into your computer right now? Lucky for you, you can (well, maybe not litterally)! I'm going to be posting these skeins in my Etsy Shop later today! Yep, that means you can own the above yarn!
Bye for now!
Grace Ann
***UPDATE: Find the yarn over here!***
This past weekend was spent dying yarn! How fun! And with beautiful results!!
Check this out:


Bye for now!
Grace Ann
***UPDATE: Find the yarn over here!***
8.2.12
Crochet Ruffle Valentine Wreath-FREE pattern!
It's been a while since I've posted, but I have a good excuse *ahem* reason. I've been working on a ruffle wreath pattern! It was inspired by those gorgeous felt ruffle wreaths. I thought first that I could make a bunch of crocheted circles and pin them on a wreath form. But that would be very time consuming and... at two ends a circle that's a ton of weaving, so I came up with this :)
The basics of this pattern is a crocheted base with two rounds, one made in the back loops only. This creates three available ridges to fill up with beautiful ruffles.
Here goes! Enjoy!


Yarn-Red Heart Super Saver or a worsted weight with some "stiff-ness". Nothing like Simply soft or Bernat satin--It's a little to "limp" If you know what I mean :)
Hook-G
Scissors
Darning needle
Abbreviations:
Ch-Chain
Dc-Double Crochet
Tr-Triple crochet (also called treble crochet)
Dec3-*Yo, draw up a loop in next st, pull trough 2 loops* repeat from *to* a total of three times. Yo, draw through all loops on hook
sts-stitches
Pattern:
Ch 85
Row1: 3dc in 5th chain from hook, 1dc in each of the next 17 chains. *2dc in next, 1dc in next* repeat from *to* 4 times. 2dc in next, 1dc in next 2ch, 2dc in next, 1dc in next, 2dc in next 2ch, 1dc in next 3ch. Dec3, skip 3ch, Dec3. 1dc in each of the next 3ch, 2dc in next 2ch, 1dc in next, 2dc in next, 1dc in next 2, 2dc in next. *1dc in next, 2dc in next* repeat from *to* 4 times. 1dc in each of the next 17 dc. (3dc, 1tr) in last ch. Ch3, join to top of beginning ch4.
Use your tail end (coming from your slip knot) to seam your bottom piece together to form a heart shape. Be careful not to twist your shape when joining.
Row2:~Worked in Back Loops Only~ Ch3, 2dc in next, 1dc in next 19 sts. *2dc in next 2 sts, 1dc in next* Repeat from *to* 4 times. 1dc in next 9 sts. 2dc in next, 1dc in next 4 sts. Skip 2 sts. 1dc in next 4 sts, 2dc in next. 1dc in next 9 sts. *1dc in next, 2dc in next 2* Repeat from *to* 4 times. 1dc in next 19 sts. 2dc in next, 1dc in next, 1dc in front loop of next chain, 3tr in front loop of next chain, 1dc in front loop of next chain, join with sl st to beginning ch 3. Break yarn.
BASE FINISHED
RUFFLES BEGIN
Outside ruffle: ~Worked in Front Loops~ Join yarn in any stitch of Row2. Ch3, 2dc in same st. 3dc in next 2sts. 3dc around post of next dc. *3dc in next 3front loops, 3dc around post of next st.* Repeat from *to* until you get to either the heart point or the heart dip-follow directions accordingly
Heart Point- Continue with pattern, disregarding some stitches are triples.
Now continue with the 3dc in next 3 front loops, 3dc around next dc post pattern until you get to the dip in the heart.
Heart dip- Simple as this: SlSt in space of skiped sts from row2.
Now continue with the 3dc in next 3 front loops, 3dc around next dc post pattern until you get to the heart point.Break yarn
Middle Ruffle: ~Worked in front loops of round 1~ Join yarn in any front loop of Row1. Ch3, 1dc in same space. *2dc in each front loop* Repeat from *to* around.
This row of ruffles isn't imperative, so when you get to the dip and the point, just do your best to get 2dc in each space.Break Yarn
Inner Ruffle: ~Worked in opposite side of beginning chain~ This round is similar to the outer ruffles, except your dc's are worked in the beginning chain, and your posts are worked on the bottom of the dc's of Row 1. Did that make sense? Probably not. Let me explain...
If you look at the first pic, you see the scallops of the ruffles on the outer edge lean outwards. We're trying to make the inner row face inwards. ??? Yeah, that didn't clear it up much further. Let me know in a comment if you have any questions!
Anywho, back to the pattern....
Work your "3dc in next 3 front loops, 3dc around next dc post" pattern all around the inner edge. When you get to the inner point, just SlSt to make it point down. When you get to the inner dip, throw a few triple crochets in there to make it have a bit more 'point'.Break yarn
Weave in ends and *exhale* you're done!
Wow! That was tough to explain! I was going to add a few videos, but blogger isn't cooperating for some reason..... :( Maybe in a day or two. Fingers crossed!
But for now, go try and make yourself a heart! It's really not as confusing as I made it sound! You know how sometimes, something's easier to understand when you just do it? Yeah, that's it here.
Bye for now blogger friends,
Grace Ann
PS-Let me know if you see any mistakes! I had this all scribbled in my crochet journal as I was working, so there may be a couple! I've looked it over a few times and I didn't see anything, but you know how it is!Sorry bout that!
PPS-Oh! And please, please, please don't post this pattern as your own! I spent quite a while on it, and I really wouldn't want to log onto blogger tomorrow and see a million versions of my pattern! You ARE allowed, in fact encouraged, to sell what you make! Just post a link here if it's online so I can see! :)
----------♥----------♥----------♥----------♥-----------♥----------
Edit:
Some people have been having trouble with their stitch counts... if the above version doesn't work out for you, try this one:
Row1: 3dc in 5th chain from hook, 1dc in each of the next 17 chains. 2dc in next, 1dc in next repeat from to 4 times. 2dc in next, 1dc in next 2ch, 2dc in next, 1dc in next, 2dc in next 2ch, 1dc in next 3ch. Dec3, skip 3ch, Dec3. 1dc in each of the next 3ch, 2dc in next 2ch, 1dc in next, 2dc in next, 1dc in next 2, 2dc in next. 1dc in next, 2dc in next repeat from to 4 times. 1dc in each of the next 17 dc. (3dc, 1tr) in last ch. Ch3, join to top of beginning ch4Join with 1st dc instead of chain 4.
Use your tail end (coming from your slip knot) to seam your bottom piece together to form a heart shape. Be careful not to twist your shape when joining.
Row2:~Worked in Back Loops Only~ Ch3, 2dc in next, 1dc in next 19 sts. 2dc in next 2 sts, 1dc in next Repeat from to 4 times. 1dc in next 9 sts. 2dc in next, 1dc in next 3 sts. Skip 2 sts Skipping 3 stitches instead of 2. 1dc in next 3 sts, 2dc in next. 1dc in next 9 sts. 1dc in next, 2dc in next 2 Repeat from to 4 times. 1dc in next 19 sts2dc in next. Working in back loop of ch, 2dc in next ch, ch 1, Tr in next ch, ch 1, 2dc in next ch. Join in top of first dc. Break yarn
Thank you to Amy for writing up this version :)
Edit again:
I made some chainges up there ↑ that may help... just be sure to follow the pattern to the letter. (I just followed my own pattern and it didn't make sense, so I added some things that may help). Those things typed in green are things that have tripped some people up... make sure you take a good look at those :)
I also added a few pics of the backside by itself. Hopefully they'll make things clearer... :)

This is right before I did my first decrease of three... see the chain I still have to work into?

Finished row 1--Note, I DID have to flatten this to get it to lay flat. It's was all curly by itself..

This is my join of row 1 (it's at the very end). Where you chain 3 the join to the chain in the beginning. You can kinda see that I took the end tail and used it to join the two sides of the inner edge together... that made zero sense, even to me...

Finished base :) Nice even heart shape! Yay!
Edit: A lovely reader of mine suggested making the base out of plarn (plastic bag yarn) to make the heart stiff. That way, you don't need to use starch, and the heart still holds it's shape.
21.1.12

19.1.12
7.1.12
Crochet Ireland's Scarf

Check out this pretty scarf over at Crochet In Color. It uses extended single crochet, which I really think gives a great texture and pattern to the scarf! Love! Find it here!
31.12.11
Yarn Dyeing with Easter Egg Colors
Hey everyone!
For my first post in 2012, I decided to try something I had never done before. And, I figured I would document it and post it as a tutorial on here if it worked out well. Well, it certainly did, so here it is... the tutorial for how to Dye yarn with Easter Egg Colors. I hope it helps some of you, and just let me know if you have any questions at all.
Materials:
100% Wool Yarn--This is extremely important. You have to have some sort of animal fiber; wool, alpaca, or something of that type. I used Patons Classic Wool that I found on sale at Michaels and it seemed to work fine :) Looks like this:

Vinegar
Water
Easter egg colors--You can get them for super cheap the day after Easter, so pick up a bunch then. I just happened to have a spare box lying around. You might be able to find them at the Dollar Store right now if you don't have a pack.
Bowl
2 Chairs--This will make sense in a second
2 or 3 small containers
Scrap acrylic or cotton yarn
Microwave
Procedure:
First, you need to wind your yarn into a hank. It will not work if your yarn is in skein form or ball form. This is because the yarn in the center of the skein or ball is too "protected" by the outermost layers of yarn. You can wind your yarn into a hank by putting two chairs back to back a few feet away from each other and winding your yarn around them.
Next, you need to use scrap acrylic or cotton yarn to secure your hank so it doesn't tangle in the dying process. You will use acrylic or cotton because it won't absorb the dye color, so it will be easy to find later.
Now, prepare your water vinegar solution. Depending on how much yarn you have, you may need to add more or less vinegar. I think I had about 210 yards, so you can sort of gauge it off that. If you can't figure this out, don't stress. It isn't an exact science. I used 1 cup vinegar and about 6 cups water. Once you have that in a bowl large enough to hold your yarn, go ahead and dunk your yarn into your mixture. It will float initially, just push it down into the water/vinegar and wait for it to absorb. Let this sit for about an hour.


Once you have your colors dissolved, you can pour them over your yarn! Pour them any way you choose, they will look lovely every single time.

Then, microwave! Put your yarn bowl in for 2 minutes, then let it set for 2 minutes. Continue this until the water your yarn is in is completely clear. Totally clear. Not-a-stitch-of-dye-in-there clear.

Then, let it sit while you fill up your sink with hot water.

The reason you need it hot is because the yarn is hot right now. If you put it in cold water, your yarn would felt (because, remember, it's wool!), and all your work would go down the drain. Literally.
Dump your yarn in and gently swoosh it around to get all the vinegar out. (But not too much! Friction + Hot water + wool = Nightmare) Now lay a towel out on your counter and lay your hank on top (you may need to let it drip over the sink before you do this). Then, fold the excess towel over top and gently press the water out.

Now, hang your yarn on a hanger and put it in a doorway or in the shower where it can have good air circulation.


 Mmmmm..... I could just eat it!
And here they are together :)
 I went rather picture happy, didn't I? I just couldn't help it! These skeins are the. most. gorgeous. yarn I've ever seen in my life!
So anywho, I hope you'll give my tutorial a try! Have fun!
Grace Ann

For my first post in 2012, I decided to try something I had never done before. And, I figured I would document it and post it as a tutorial on here if it worked out well. Well, it certainly did, so here it is... the tutorial for how to Dye yarn with Easter Egg Colors. I hope it helps some of you, and just let me know if you have any questions at all.
Materials:
100% Wool Yarn--This is extremely important. You have to have some sort of animal fiber; wool, alpaca, or something of that type. I used Patons Classic Wool that I found on sale at Michaels and it seemed to work fine :) Looks like this:

Vinegar
Water
Easter egg colors--You can get them for super cheap the day after Easter, so pick up a bunch then. I just happened to have a spare box lying around. You might be able to find them at the Dollar Store right now if you don't have a pack.
Bowl
2 Chairs--This will make sense in a second
2 or 3 small containers
Scrap acrylic or cotton yarn
Microwave
Procedure:
First, you need to wind your yarn into a hank. It will not work if your yarn is in skein form or ball form. This is because the yarn in the center of the skein or ball is too "protected" by the outermost layers of yarn. You can wind your yarn into a hank by putting two chairs back to back a few feet away from each other and winding your yarn around them.
Next, you need to use scrap acrylic or cotton yarn to secure your hank so it doesn't tangle in the dying process. You will use acrylic or cotton because it won't absorb the dye color, so it will be easy to find later.
Now, prepare your water vinegar solution. Depending on how much yarn you have, you may need to add more or less vinegar. I think I had about 210 yards, so you can sort of gauge it off that. If you can't figure this out, don't stress. It isn't an exact science. I used 1 cup vinegar and about 6 cups water. Once you have that in a bowl large enough to hold your yarn, go ahead and dunk your yarn into your mixture. It will float initially, just push it down into the water/vinegar and wait for it to absorb. Let this sit for about an hour.

Now it's time to create your color scheme. You'll want to choose from the general color families. This is because if you choose Orange and Navy, you'll end up with a substantial amount of brown. I chose orange and red (which turned into pink).
So now that you have a general idea of colors, you need to mix 'em up! You will need two or three colors if you're going to use my recipe, so just keep that in mind when deciding. Into each one of your containers put: 1/2 cup water and 1 Tablespoon Vinegar. Then, drop your tablets in.

Notice I didn't mention that sometimes it takes a few tries to get the color you thought the tablet actually was. For instance, I thought the tablet that looked yellow was actually yellow. Nope. Green. I can just about guarantee that will happen to you, so just dump it out and try again.

Once you have your colors dissolved, you can pour them over your yarn! Pour them any way you choose, they will look lovely every single time.

(For the observant reader: Yes, my water is clear in this pic, indicating this was after I cooked it. I just forgot to take a pic of the pouring of the colors)
Then, microwave! Put your yarn bowl in for 2 minutes, then let it set for 2 minutes. Continue this until the water your yarn is in is completely clear. Totally clear. Not-a-stitch-of-dye-in-there clear.

Then, let it sit while you fill up your sink with hot water.

The reason you need it hot is because the yarn is hot right now. If you put it in cold water, your yarn would felt (because, remember, it's wool!), and all your work would go down the drain. Literally.
Dump your yarn in and gently swoosh it around to get all the vinegar out. (But not too much! Friction + Hot water + wool = Nightmare) Now lay a towel out on your counter and lay your hank on top (you may need to let it drip over the sink before you do this). Then, fold the excess towel over top and gently press the water out.

It's in there!
Now, hang your yarn on a hanger and put it in a doorway or in the shower where it can have good air circulation.


Now comes the tragic part that all yarn lovers detest. Waiting. Yes, you must wait for the wonderful new skein of yarn you just dyed to dry so that you can use it! Torture I say, torture! So sit back and admire for a good couple hours.
But the good part is, it's totally worth it. Check this out!


Pretty, right? I couldn't be more happy with how this came out. It's simply perfect!
I also tried Kool Aid dying and it worked out just as well :)


And here they are together :)

So anywho, I hope you'll give my tutorial a try! Have fun!
Grace Ann
Subscribe to:
Posts (Atom)