30.8.11

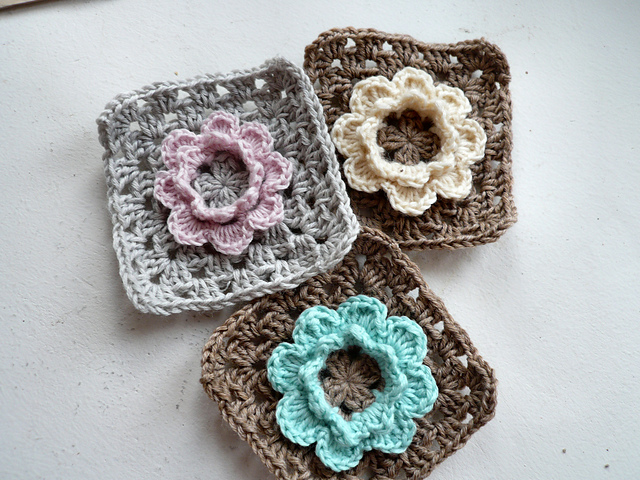
French Nannie's Granny Flower Square


These are too cute! I love the classic, vintage look of the colors she used in the example. Find the tutorial here.

16.8.11

Pointy Petals Flower


How cute! I love this flower! Not too much, not too little :) Just perfect! Find the complete tut over here!

14.8.11

Crochet Wallet Pattern

First of all, I'd like to say a huge thank you to all who have left comments on my blog! I read each and every one!
Today I would like to share a wonderful crocheted wallet pattern...
Small and compact, the perfect thing to pop in your purse! And super easy as well! Find it here.

8.8.11

My new WIP

A while ago, I was browsing Attic 24. I'm sure you've heard of this wonderful, inspirational crochet blog. If you haven't, you must check it out!
Anywho, I scrolled and clicked through all the colorful pictures and tutorials; drooling at each and every project. The one I really loved was the Granny Stripe. I'd seen the project many times around on various blogs. So when I finished my Round Ripple, I knew that would be the perfect new project! I started on it last night and I'm enjoying it immensely.
The stripes are so quick and easy. If you're looking for a mindless pattern to whip up while you're watching TV, you've found it.

I'm loving this pattern so much! I'm picking the colors randomly from my stash. My only "rule" is that when I do one color, the next color must contrast to the previous one. I think it really gives the colors definition. I'm using Red Heart Super Saver for most of it, but I'm also throwing in a few colors of Micheals "Impeccable" by Loops and Threads.
Want to make your own? Here's the Pattern!
Have a wonderful day!
Grace Ann

6.8.11

Round Ripple~All finished!

Hey Everyone!
Remember when I mentioned the round ripple I was testing a few posts ago? Well, it's all done! And I have to say--It looks gorgeous!
Oh how pretty!

And here it is all folded up--love it!

It's made out of Red Heart Super Saver for the colors and Caron One Pound for the white. When I was at Wal-Mart picking out colors, this brown caught my eye. This picture doesn't do it justice! It almost looks like a creamy mocha color. Maybe it's a new color or maybe it's just me but it's lovely!

And here it is draped over a chair in my living room. This picture shows just how huge this blanket is!
One last pic:

Looks like someone else loves this blanket as well! :)
Have a great day!
Grace Ann


4.8.11

Hand Colored Yarn Tutorial

Hey everybody!
Today I have something super neat to share. Hand colored yarn! And I know what you're thinking--"Ah... you certainly aren't the first person to think of this." Well, yes, I know that, but I may just be the first person to think of doing it with... markers!
Yes, you did read that right. I said markers.
What does it look like you may ask? Check it out....
Pretty cool, huh? Yep, I thought so too! So let's get started!


Before you begin:
Be sure to have some nail polish remover or rubbing alcohol at the ready with a cotton ball. Your fingers will get kind of messy. But, trust me, it's totally worth it!

What you'll need:
Markers (Any kind will work. If you are planning on washing your finished garment then you'll want to use sharpies or something permanent. I just used some cheap-o markers I bought at Micheals. After my coupon they were $2.50. Yes, $2.50 for all those!)
Yarn (lightly colored, otherwise your colors won't show up)

Next, you'll want to pick out a color scheme. I suppose you could just do random colors and that would look equally nice. But I decided on purple, brown and blue.

Now, you'll want to figure out how to hold your yarn. I like to hold mine with my pointer and middle finger holing the end portion of the yarn and my ring finger and thumb holding the yarn coming from the skein. Like so:

Now for the fun part! Coloring! Take your marker and gently but firmly rub it up and down the section of yarn you are holding.
Use your thumb to rotate the yarn around so you can coat all sides of the yarn.
Now pull about a foot of yarn through your fingers and repeat. Do this until you have a length of yarn suitable for your project. Then snip your yarn. Remember, the farther you space your color sections, the faster it will go. After you have a good amount, you should be looking at this:

Now color that same length of yarn with the next color in your scheme. And then the third. You can space your sections however you wish. Put them right up close to each other or farther apart. Either way looks wonderful when you crochet or knit it up. Right about now you should have this:
Lovely! Now your yarn is ready to be made into something wonderful! I just made a swatch so you can get the idea of what it looks like:

Love, love, love. The possibilities are simply endless! Imagine leopard print or zebra. Rainbow maybe! So go grab some of your white yarn and make some! I can guarantee you that you'll love it!You're kids may even enjoy coloring the yarn as well! Let me know what you think! 
Enjoy!
Grace Ann
1.8.11

Crochet Bow Belt


Ah! Too cute! I like that you can make it any size. Even just the bow is cute! Check it out here.